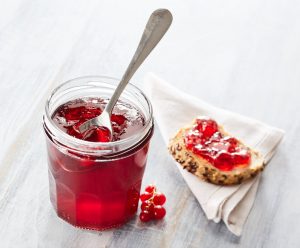
Elderberry jelly is a delightful and flavorful preserve that captures the essence of ripe elderberries. Perfect for spreading on toast, pairing with cheese, or adding a sweet touch to your desserts, this jelly is a fantastic way to enjoy the health benefits and unique taste of elderberries.
Photos of Elderberry Jelly Recipe
Some of the ingredients in this recipe, like elderberries and monocalcium phosphate (MCP), might not be commonly found in your pantry. You may need to visit a specialty store or a well-stocked supermarket to find these items.
Ingredients Needed For Elderberry Jelly Recipe
elderberries: Small, dark berries known for their rich color and tangy flavor, often used in jams and jellies.
lemon juice: Adds acidity to the jelly, balancing the sweetness and helping in the gelling process.
mcp: Monocalcium phosphate, a type of pectin used to help the jelly set properly.
white granulated sugar: Sweetens the jelly and helps it to gel by interacting with the pectin.
butter: Reduces foaming during the boiling process, ensuring a clear jelly.
One reader, Fabe Snider says:


This elderberry jelly recipe is fantastic! The flavor is rich and tangy, and the instructions are clear and easy to follow. My family loved it, and it was a hit at our breakfast table. Highly recommend giving it a try!
Key Techniques for Crafting the Perfect Elderberry Jelly
How to rinse elderberries: Fill a kitchen sink with water and submerge the elderberry clusters to clean them thoroughly. How to de-stem elderberries: Use your fingers or the tines of a fork to gently dislodge the berries from the stems over a large bowl. How to crush berries: Use a potato masher to crush the berries in a large pot to release their juices. How to sterilize jars: Place rinsed jars on a baking sheet in the oven at 200 degrees F for 10 minutes. How to sterilize lids: Pour boiling water over the lids placed in a shallow bowl to sterilize them. How to strain juice: Use a fine-mesh sieve or layers of cheesecloth to strain the juice from the mashed berries into a pot. How to can jelly: Pour the hot jelly mixture into sterilized jars, leaving ¼-inch headspace, wipe the rims, and secure the lids and rings.
How To Make Elderberry Jelly
Enjoy the health benefits and the rich taste of wild elderberries in a jam with this delicious Elderberry Jelly recipe including a step-by-step process.
Serves:
Ingredients
- ¾lbselderberries,ripe
- ¼cuplemon juice,freshly squeezed
- MCP (Monocalcium Phosphate),(1 packet) or SureJell pectin
- 4½cupswhite granulated sugar
- ¼tspbutter
Instructions
-
Rinse the elderberry clusters thoroughly by putting them in the basin of a kitchen sink, and fill it up with water.
-
Working over a large bowl, work on 1 small cluster at a time, gently raking the fingers or the tines of a fork across the clusters to dislodge the berries from the stems.
-
For each batch of jelly, collect 3 pounds of de-stemmed elderberries (about 8 to 10 cups).
-
Place the berries in a large pot and crush with a potato masher to release some of the juices.
-
Turn the heat to medium and continue to crush as the mixture heats up to a boil.
-
Once the berries and their juices reach a boil, reduce the heat to low and let the berries simmer for 10 minutes.
-
Remove from heat.
-
Place a large fine-mesh sieve, or 4 layers of cheesecloth, over a pot.
-
Slowly transfer the mashed berries and juice over the sieve to strain the juice out into the pot. Let strain for 1 hour.
-
For jars needed for canning, 5 to 6 8-ounce canning jars and lids are needed.
-
Rinse out the jars and place on a baking sheet, top-up, in the oven. Heat for 10 minutes at 200 degrees F to sterilize the jars.
-
To sterilize the lids, bring a kettle of a couple of cups of water to a boil.
-
Place lids in a shallow bowl and pour the boiling water over them.
-
To make 1 batch of jelly, 3 cups of juice will be needed, if using MCP or SureJell pectin. (Any amount more than that can be reserve for making syrup, or be added to another batch for jelly.)
-
Place 3 cups of juice into a large, high-sided, wide pot (8-quart).
-
Add the lemon juice and pectin. Bring to a boil on high heat.
-
Add 4½ cups sugar and ¼ teaspoon of butter.
-
Stir with a wooden spoon. Bring to a boil again.
-
Watch the pot as the mixture will foam up considerably. There may be a need to lower the heat a bit to keep the foam from boiling over the pot.
-
Boil the mixture, then pour into canning jars:
-
As soon as the mixture reaches a rolling boil that cannot be diminished by stirring, watch the clock.
-
At exactly 2 minutes, remove from heat and pour the mixture into canning jars to ¼-inch of headspace from the rim.
-
Wipe rims with a damp paper towel. Place lids on jars and rings to secure.
Recipe Notes
- Use mostly berries that are completely blue or black. A few underripe green berries are fine; they have more pectin and including them will help the jelly set
- By the way, the reason why a small amount of butter is added is to help keep the mixture from boiling up as high.
- If desired, to ensure a good seal and to protect against mold (any potentially harmful bacteria will already be destroyed by the sugar concentration of the jelly), process the jars in a water bath for 5 minutes. To do so, put a steaming rack at the bottom of a large, tall pot. Fill the pot halfway with water (enough to cover jars with 1 to 2-inches of water when in the pot), bring to a boil, gently place the jars in the pot (helps to use a jar lifter, tongs, or be wearing rubber gloves), boil for 5 minutes, and remove. Let cool. As the jelly cools, a popping sound should be heard as the lids seal.
- Sometimes even half as much pectin will cause the jelly to set, though perhaps not as firm as the whole amount.
Nutrition
- Calories: 3753.24kcal
- Fat: 2.81g
- Saturated Fat: 0.71g
- Trans Fat: 0.04g
- Monounsaturated Fat: 0.52g
- Polyunsaturated Fat: 0.89g
- Carbohydrates: 966.63g
- Fiber: 24.00g
- Sugar: 899.74g
- Protein: 2.47g
- Cholesterol: 2.54mg
- Sodium: 30.15mg
- Calcium: 142.22mg
- Potassium: 1033.66mg
- Iron: 5.94mg
- Vitamin A: 110.15µg
- Vitamin C: 146.08mg
Crucial Technique Tip for Mastering Elderberry Jelly
When making elderberry jelly, ensure that you crush the elderberries thoroughly with a potato masher to release as much juice as possible. This will help in extracting maximum flavor and ensure a smooth consistency for your jelly.
Time-Saving Tips for Making Elderberry Jelly
Prepare the berries in advance: Rinse and de-stem the elderberries ahead of time and store them in the fridge.
Use a food processor: Instead of manually crushing the berries, use a food processor to save time.
Pre-measure ingredients: Measure out the sugar, lemon juice, and pectin before starting.
Sterilize jars simultaneously: Sterilize the canning jars in the oven while the berry mixture is simmering.
Batch processing: Make multiple batches of juice and store for future use.
Substitute Ingredients For Elderberry Jelly Recipe
elderberries - Substitute with blackberries: Blackberries have a similar tartness and deep color, making them a good alternative for elderberry jelly.
lemon juice - Substitute with lime juice: Lime juice provides a similar acidity and citrus flavor, which helps in setting the jelly.
mcp (monocalcium phosphate) - Substitute with pectin: Pectin is a common gelling agent used in jelly making and will help achieve the desired consistency.
white granulated sugar - Substitute with honey: Honey can be used as a natural sweetener, though it may slightly alter the flavor and color of the jelly.
butter - Substitute with margarine: Margarine can be used to reduce foaming during the cooking process, similar to butter.
Creative Ways to Present Your Elderberry Jelly
Use pristine jars: Select elegant, clear glass canning jars to showcase the deep, rich color of the elderberry jelly. Ensure they are sterilized and spotless.
Layer with textures: Place a small dollop of elderberry jelly on a crisp, thin slice of toasted baguette. Add a smear of creamy goat cheese to contrast the jelly's sweetness.
Garnish with finesse: Top each serving with a delicate sprig of fresh thyme or a single mint leaf to add a pop of color and a hint of herbal aroma.
Serve with accompaniments: Pair the elderberry jelly with a selection of fine cheeses, charcuterie, and crackers on a wooden board to create a sophisticated tasting experience.
Highlight the natural beauty: Drizzle a small amount of honey around the plate to enhance the visual appeal and add an extra layer of flavor.
Incorporate elegant utensils: Provide guests with small, silver spoons or spreaders to elevate the dining experience and make it easier to enjoy the jelly.
Create a balanced presentation: Arrange the elements on a pristine white plate to allow the vibrant color of the elderberry jelly to stand out, ensuring a visually appealing and balanced presentation.
Add a touch of luxury: Sprinkle a few edible gold flakes or silver pearls on top of the elderberry jelly for a touch of opulence and to impress the culinary professionals.
Essential Kitchen Tools for Making Elderberry Jelly
Kitchen sink: Used for rinsing the elderberry clusters thoroughly.
Large bowl: Needed to work over while dislodging the berries from the stems.
Fork: Utilized to gently rake across the clusters to dislodge the berries.
Potato masher: Used to crush the berries in the pot to release their juices.
Large pot: Essential for heating and simmering the elderberries and their juices.
Fine-mesh sieve: Used to strain the mashed berries and juice.
Cheesecloth: An alternative to the fine-mesh sieve for straining the juice.
Baking sheet: Needed to place the jars on for sterilization in the oven.
Oven: Used to sterilize the canning jars.
Kettle: Required to boil water for sterilizing the lids.
Shallow bowl: Used to hold the lids while pouring boiling water over them.
High-sided wide pot: Necessary for boiling the juice, lemon juice, pectin, sugar, and butter mixture.
Wooden spoon: Used for stirring the mixture while it boils.
Canning jars: Needed to store the finished jelly.
Damp paper towel: Used to wipe the rims of the jars before sealing.
Canning lids: Essential for sealing the jars after filling them with jelly.
Canning rings: Used to secure the lids on the jars.
Proper Storage and Freezing Methods for Elderberry Jelly
Once the jars have sealed and cooled, store them in a cool, dark place for up to a year. The ideal storage temperature is between 50-70°F (10-21°C).
If you plan to freeze the elderberry jelly, leave about ½ inch of headspace in the jars to allow for expansion during freezing. Use freezer-safe jars or containers to prevent cracking.
Label the jars with the date and contents before storing or freezing. This will help you keep track of when the jelly was made and ensure you use the oldest jars first.
To thaw frozen elderberry jelly, simply transfer the jar from the freezer to the refrigerator and allow it to thaw overnight. Once thawed, consume within 3-4 weeks.
If you notice any signs of spoilage, such as mold, off-odors, or a change in color or texture, discard the jelly immediately. Properly sealed and stored jelly should maintain its quality for up to a year.
How To Reheat Elderberry Jelly Leftovers
- The best way to reheat leftover elderberry jelly is to scoop the desired amount into a microwave-safe bowl and heat it in the microwave for 10-15 seconds at a time, stirring between each interval, until it reaches your desired temperature. This method ensures that the jelly heats evenly without overheating or burning.
- Another option is to place the jelly in a small saucepan over low heat on the stovetop. Stir the jelly constantly to prevent scorching and ensure even heating. Heat the jelly until it reaches your desired temperature, then remove it from the heat and serve immediately.
- If you prefer a softer, more spreadable consistency for your reheated elderberry jelly, you can add a small amount of water (about 1 teaspoon per 1/4 cup of jelly) before heating it in the microwave or on the stovetop. This will help to loosen the jelly and make it easier to spread on toast, biscuits, or other baked goods.
- When reheating larger quantities of elderberry jelly, it's best to use the stovetop method to ensure even heating throughout. Transfer the jelly to a saucepan and heat it over low heat, stirring frequently, until it reaches your desired temperature. You may need to add a small amount of water to help loosen the jelly and prevent it from sticking to the bottom of the pan.
- Regardless of the reheating method you choose, be sure to store any leftover elderberry jelly in an airtight container in the refrigerator. Properly stored, the jelly should remain fresh and flavorful for up to 3 weeks. Always inspect the jelly for signs of mold or spoilage before reheating and consuming it.
Fascinating Fact About Elderberry Jelly You Didn't Know
A random fact about this recipe is that elderberries have been used for centuries in traditional medicine due to their high levels of antioxidants and vitamins.
Is Making Elderberry Jelly at Home Cost-Effective?
Creating elderberry jelly at home can be quite cost-effective. Elderberries are often foraged or bought in bulk, reducing costs. The primary expenses are sugar, lemon juice, and pectin. For a household of 4, the approximate cost is around $10-$15, considering you might already have some ingredients like butter. Given the yield and the unique flavor, this recipe scores a solid 8/10 for cost-effectiveness.
Is Elderberry Jelly Healthy or Unhealthy?
The elderberry jelly recipe, while delicious, is not particularly healthy due to its high sugar content. Here's a breakdown of the recipe's nutritional aspects:
- Elderberries: Rich in antioxidants, vitamins, and minerals, elderberries offer numerous health benefits, including boosting the immune system and reducing inflammation.
- Sugar: The recipe calls for 4½ cups of white granulated sugar, which is a significant amount. Consuming excessive sugar can lead to various health issues, such as obesity, diabetes, and heart disease.
- Lemon juice: The addition of lemon juice provides some vitamin C and helps balance the sweetness of the jelly.
- Butter: The small amount of butter used in the recipe is unlikely to have a significant impact on the overall healthiness of the jelly.
To make this recipe healthier, consider the following suggestions:
- Reduce the amount of sugar used in the recipe. Start by cutting the sugar by 1/4 to 1/2 cup and adjust according to taste preferences. Alternatively, experiment with natural sweeteners like honey, maple syrup, or stevia.
- Increase the proportion of elderberries to sugar, which will result in a more fruit-forward jelly with less added sugar.
- Explore low-sugar or no-sugar pectin options to help the jelly set without relying on large amounts of sugar.
- Serve the elderberry jelly in smaller portions and pair it with whole-grain toast, yogurt, or oatmeal to add fiber and nutrients to the overall meal.
Editor's Take on This Delightful Elderberry Jelly Recipe
This elderberry jelly recipe is well-structured and thorough, ensuring a successful outcome. The detailed instructions for sterilizing jars and lids are crucial for safe canning. The use of lemon juice and pectin ensures a good set, while the addition of butter helps reduce foam. However, the recipe could benefit from specifying the exact amount of pectin needed. Overall, it's a reliable and clear guide for making delicious elderberry jelly.
Enhance Your Elderberry Jelly Recipe with These Unique Side Dishes:
Delicious Alternatives to Traditional Elderberry Jelly
Why trust this Elderberry Jelly Recipe:
This elderberry jelly recipe is meticulously crafted to ensure perfect results every time. With precise measurements and clear instructions, it guarantees a delicious and smooth jelly. The use of lemon juice adds a delightful tang, while monocalcium phosphate ensures proper setting. Sterilization steps for canning jars and lids ensure safety and longevity. Trust this recipe for its attention to detail and commitment to quality.
Was this page helpful?
Have your own special recipe to share? Submit Your Recipe Today!
