Get ready to indulge in a delightful treat with these homemade oreos. Perfectly chocolatey cookies sandwiching a rich and creamy filling, these cookies are a fun and delicious way to bring a classic store-bought favorite into your own kitchen.
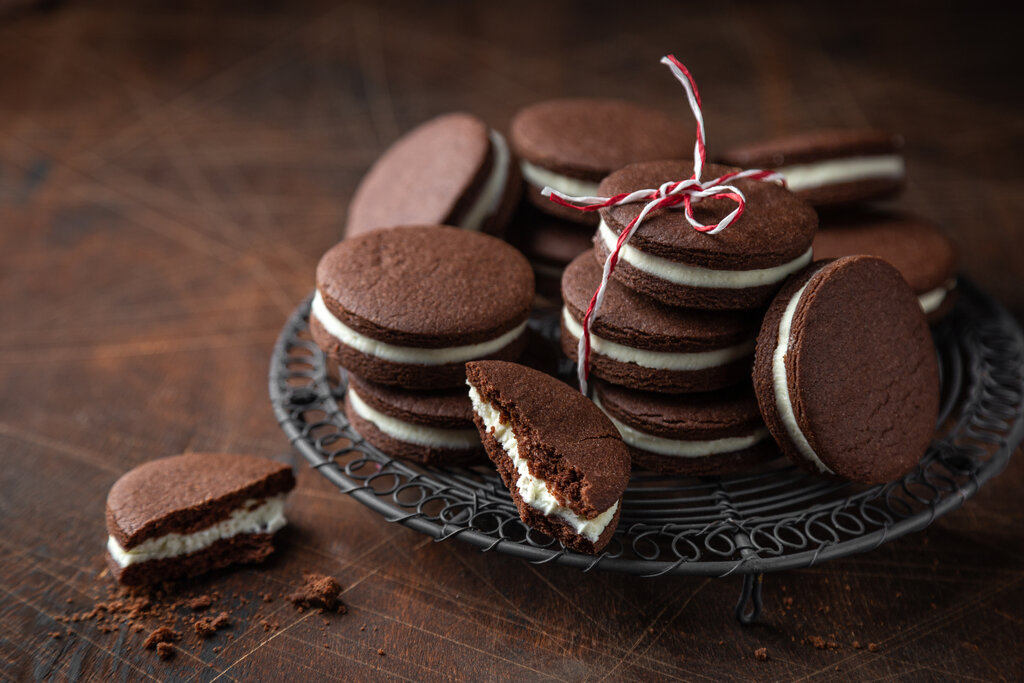
Photos of Homemade Oreos Recipe
While most of the ingredients for these homemade oreos are common pantry staples, you might not always have natural cocoa powder or vegetable shortening on hand. Be sure to check your pantry before heading to the supermarket, as both will be crucial for achieving that signature cookie texture and flavor.
Ingredients For Homemade Oreos
All purpose flour: Provides structure and texture to the cookies.
Natural cocoa powder: Gives the cookies their rich, chocolatey flavor.
Baking soda: Helps the cookies rise and become fluffy.
Salt: Enhances the overall flavor.
Unsalted butter: Adds richness and flavor to both the cookies and the filling.
Granulated sugar: Sweetens the cookies.
Light brown sugar: Adds a touch of molasses flavor and moisture.
Large egg: Binds the ingredients together and adds moisture.
Pure vanilla extract: Enhances the flavor of both the cookies and the filling.
Vegetable shortening: Helps achieve the creamy consistency of the filling.
Confectioners’ sugar: Sweetens the cream filling and provides a smooth texture.
One reader, Fiona Scruggs says:

These homemade Oreos are fantastic! The cookies are perfectly crisp, and the cream filling is rich and delicious. The recipe is easy to follow, and the results are better than store-bought. My family loved them, and I’ll definitely be making these again. Highly recommend!
Key Techniques for Making Homemade Oreos
How to beat butter until creamy: Use a handheld or stand mixer with a paddle attachment to beat the butter on high speed until it reaches a creamy consistency. This usually takes a few minutes. How to combine wet and dry ingredients: Turn off the mixer, pour the dry ingredients into the wet ingredients, and then turn the mixer on low speed to slowly beat until a dough is formed. How to chill dough: Cover the dough tightly with aluminum foil or plastic wrap and place it in the refrigerator for 30 minutes. How to preheat an oven: Set your oven to 350 degrees Fahrenheit and allow it to reach the desired temperature before baking. How to roll dough into balls: Use slightly chilled dough and roll it into small balls, about 2 teaspoons of dough per ball. How to flatten dough balls: Press down on the rolled dough balls to slightly flatten them before baking. How to bake cookies: Place the flattened dough balls on a baking sheet lined with parchment paper or silicone baking mats and bake each batch for 6 to 8 minutes. How to cool cookies: Allow the cookies to cool for at least 5 minutes on the baking sheet before transferring them to a wire rack to cool completely. How to make cream filling: Beat the butter and shortening together on high speed until creamy, then add confectioners’ sugar and vanilla, and beat on low for 1 minute before switching to high speed for another minute until creamy and combined. How to assemble cookies: Spread the cream filling between two cooled chocolate cookies and repeat with the rest.
Who knew homemade Oreos could taste just as great as the regular ones? Well, when I made these fresh homemade Oreo cookies, I just had to share them. There are a lot of Oreo recipes, but this one is not only delicious, it’s also easy to make at home. The ingredients are similar to making chocolate chip cookies, just minus the mini chocolate chips. So, if you’re familiar with that recipe, then you can surely make these wonderful homemade Oreos on your own.
Just like the original Oreos, this homemade Oreo cookie recipe has that iconic Oreo cream filling everyone loves. I only used butter, confectioner’s sugar, vanilla, and vegetable shortening. After blending all of these ingredients together, I got a smooth and creamy vanilla filling that’s absolutely delightful. I recommend making more homemade Oreo filling when you want a double and extra creamy cookie filling.
I made the filling first since it was easier, but feel free to begin with the actual Oreo cookies first. When making the Oreo cookie batter, make sure to chill for at least 30 minutes before shaping it. It’s an important step when you want to make these homemade Oreos last long while baking. Chilling it would help hold its shape better when cut into small circles.
Similar to the Oreo filling, the sandwich cookies were also a delight to make. I enjoyed making the Oreo cookies and turning them into a cookie sandwich with the cream filling. They turned out great and similar to their original counterpart, and I had fun munching on them. These tasty and sweet homemade cookies are perfect when served alongside a warm glass of milk.
How To Make Homemade Oreos
Enjoy these homemade Oreos full of vanilla creamy goodness that’s sandwiched between two chewy Oreo cookies. It’s a sweet treat perfect for snacking!
Serves:
Ingredients
For Oreos:
- 1¼cupsall purpose flour,spoon & leveled
- ½cupnatural cocoa powder,unsweetened
- 1tspbaking soda
- ⅛tspsalt
- ½cupunsalted butter,softened to room temperature
- ¾cupgranulated sugar
- ¼cuplight brown sugar,packed
- 1largeegg,at room temperature
- 1tsppure vanilla extract
For Cream Filling:
- ¼cupunsalted butter,softened to room temperature
- ¼cupvegetable shortening,room temperature
- 1¾cupsconfectioner’s sugar
- 1tsppure vanilla extract
Instructions
-
Toss the flour, cocoa powder, baking soda, and salt together in a large bowl. Set aside.
-
Using a handheld or stand mixer with a paddle attachment, beat the butter on high speed until creamy. Scrape down the sides and the bottom of the bowl as needed.
-
Switch the mixer to medium speed and beat in the granulated sugar and brown sugar until combined. Beat in the egg and vanilla extract, scraping down the sides and bottom of the bowl as needed.
-
Turn the mixer off and pour the dry ingredients into the wet ingredients. Turn the mixer on low and slowly beat until a dough is formed.
-
Cover the dough tightly with aluminum foil or plastic wrap and chill for 30 minutes. Chilling is mandatory.
-
Preheat oven to 350 degrees F. Remove the cookie dough from the refrigerator.
-
Line two large baking sheets with parchment paper or silicone baking mats. Set aside.
-
Roll the dough into small balls, 2 teaspoons of slightly chilled dough per ball, and place 12 on each baking sheet. Press down on the balls to slightly flatten.
-
Bake each batch for 6 to 8 minutes. These cookies are small and bake very quickly. They will appear soft when done.
-
Remove from the oven and allow to cool for at least 5 minutes on the baking sheet before transferring to a wire rack to cool completely.
Cream Filling:
-
In a small bowl using a handheld or stand mixer with a paddle attachment, beat the butter and shortening together on high speed until creamy and combined. Turn the mixer off and add the confectioners’ sugar and vanilla.
-
Beat on low for 1 minute and then switch to high and beat for 1 more minute until creamy and combined.
-
The cream filling is thick.
-
Spread cream filling between two cooled chocolate cookies. Repeat with the rest. Cookies stay fresh covered at room temperature for up to 1 week.
Nutrition
- Calories: 198.57kcal
- Fat: 10.08g
- Saturated Fat: 5.28g
- Trans Fat: 0.62g
- Monounsaturated Fat: 3.04g
- Polyunsaturated Fat: 1.07g
- Carbohydrates: 27.04g
- Fiber: 1.01g
- Sugar: 19.64g
- Protein: 1.62g
- Cholesterol: 27.60mg
- Sodium: 83.49mg
- Calcium: 9.13mg
- Potassium: 50.01mg
- Iron: 0.73mg
- Vitamin A: 62.23µg
Crucial Technique Tip for Homemade Oreos Success
When preparing the cream filling, ensure that both the butter and vegetable shortening are at room temperature before beating them together. This will help achieve a smoother and more cohesive mixture, making it easier to spread between the cookies.
Time-Saving Tips for Making Homemade Oreos
Prepare ingredients in advance: Measure and set aside all ingredients before starting. This ensures a smooth workflow.
Use a cookie scoop: A cookie scoop helps create uniform-sized cookies quickly, saving time on shaping.
Chill dough efficiently: Flatten the dough before chilling to reduce chilling time.
Preheat oven early: Start preheating the oven while you prepare the dough to avoid waiting later.
Double the batch: Make a double batch and freeze half of the dough for future use, cutting down on prep time next time.
Substitute Ingredients For Homemade Oreos Recipe
all purpose flour - Substitute with whole wheat flour: Whole wheat flour adds a slightly nutty flavor and more fiber, though it may make the cookies denser.
natural cocoa powder - Substitute with Dutch-processed cocoa powder: Dutch-processed cocoa powder has a smoother, less acidic taste, which can alter the flavor profile slightly.
baking soda - Substitute with baking powder: Use three times the amount of baking powder as a substitute, but note that it may affect the texture and rise of the cookies.
salt - Substitute with sea salt: Sea salt can be used in the same quantity and will add a slightly different mineral taste.
unsalted butter - Substitute with salted butter: Reduce the added salt in the recipe to balance the flavors.
granulated sugar - Substitute with coconut sugar: Coconut sugar has a lower glycemic index and adds a caramel-like flavor.
light brown sugar - Substitute with dark brown sugar: Dark brown sugar has more molasses, which will add a richer flavor and darker color.
large egg - Substitute with flax egg: Mix one tablespoon of ground flaxseed with three tablespoons of water to replace the egg, suitable for a vegan option.
pure vanilla extract - Substitute with vanilla bean paste: Vanilla bean paste has a more intense vanilla flavor and includes vanilla bean specks.
unsalted butter - Substitute with coconut oil: Coconut oil can be used in the same quantity and adds a subtle coconut flavor.
vegetable shortening - Substitute with coconut shortening: Coconut shortening is a healthier alternative and works similarly in the recipe.
confectioner's sugar - Substitute with powdered coconut sugar: Powdered coconut sugar is a less processed option with a caramel-like flavor.
pure vanilla extract - Substitute with almond extract: Almond extract provides a different but complementary flavor, though it is stronger, so use half the amount.
Presentation Ideas for Your Homemade Oreos
Use high-quality ingredients: Ensure that you use the finest all purpose flour, natural cocoa powder, and pure vanilla extract to elevate the flavor profile of your homemade oreos.
Uniform cookie size: Roll the dough into perfectly uniform balls, using a small ice cream scoop for precision. This ensures even baking and a professional appearance.
Perfectly baked cookies: Bake the cookies until they are just set, ensuring they remain soft and tender. Overbaking will result in a dry texture.
Smooth cream filling: Beat the butter and vegetable shortening until they are completely smooth before adding the confectioner's sugar. This will create a silky and luxurious filling.
Consistent filling thickness: Use a piping bag to apply the cream filling between the cookies. This ensures a consistent thickness and a clean edge.
Elegant presentation: Stack the oreos neatly on a pristine white plate. Garnish with a light dusting of confectioner's sugar and a few cocoa nibs for a touch of sophistication.
Serve with a complementary beverage: Pair the oreos with a small glass of cold milk or a shot of espresso to enhance the overall tasting experience.
Attention to detail: Ensure each oreo is identical in size and shape, reflecting the precision and care taken in their preparation.
Essential Tools for Making Homemade Oreos
Large bowl: Used for mixing the dry ingredients like flour, cocoa powder, baking soda, and salt.
Handheld mixer: Useful for beating the butter until creamy and for mixing other ingredients.
Stand mixer with paddle attachment: Ideal for beating the butter, sugars, egg, and vanilla extract together, as well as for forming the dough.
Aluminum foil: Used to cover the dough tightly before chilling.
Plastic wrap: An alternative to aluminum foil for covering the dough.
Refrigerator: Necessary for chilling the dough for 30 minutes.
Oven: Preheated to 350 degrees Fahrenheit for baking the cookies.
Baking sheets: Lined with parchment paper or silicone baking mats to bake the cookies on.
Parchment paper: Used to line the baking sheets to prevent the cookies from sticking.
Silicone baking mats: An alternative to parchment paper for lining the baking sheets.
Wire rack: Used for cooling the cookies completely after baking.
Small bowl: Used for mixing the cream filling ingredients.
Spatula: Handy for scraping down the sides of the bowls and for spreading the cream filling between the cookies.
Measuring cups: Essential for accurately measuring the ingredients.
Measuring spoons: Used for measuring smaller quantities of ingredients like baking soda, salt, and vanilla extract.
Storing and Freezing Your Homemade Oreos
Here are the storing and freezing guidelines for homemade Oreos:
- Store the cookies in an airtight container at room temperature for up to 1 week. Separate the cookie layers with parchment paper to prevent them from sticking together.
- For longer storage, freeze the cookies for up to 2-3 months:
- Place the cookies in a single layer on a baking sheet and freeze until solid, about 1-2 hours.
- Once frozen, transfer the cookies to a freezer-safe container or resealable plastic bag, separating the layers with parchment paper.
- To thaw, remove the desired number of cookies from the freezer and let them sit at room temperature for 15-20 minutes before serving.
- If you want to freeze the cookie dough for later use:
- Roll the dough into balls and place them on a baking sheet.
- Freeze the dough balls until solid, about 1-2 hours.
- Transfer the frozen dough balls to a freezer-safe container or resealable plastic bag.
- When ready to bake, remove the desired number of dough balls from the freezer and let them thaw at room temperature for 15-20 minutes before baking according to the recipe instructions.
- Avoid storing the cookies in the refrigerator, as the moisture can cause them to become soft and lose their crisp texture.
Interesting Trivia About Homemade Oreos
A fun fact about this homemade oreos recipe is that chilling the dough for at least 30 minutes is crucial. This step helps the cookies maintain their shape and prevents them from spreading too much during baking.
Is Making Homemade Oreos Cost-Effective?
This homemade oreos recipe is quite cost-effective for a household. The primary ingredients like all-purpose flour, cocoa powder, and sugar are pantry staples and relatively inexpensive. Specialty items like pure vanilla extract and vegetable shortening might add a bit to the cost, but they are used in small quantities. Overall, the approximate cost for a household of 4 people is around $8-$10. Considering the yield and the quality of homemade desserts, this recipe scores a solid 8 out of 10 in terms of cost-effectiveness.
Are Homemade Oreos Healthy or Unhealthy?
This homemade Oreos recipe, while undeniably delicious, is not particularly healthy. The main ingredients - all-purpose flour, sugar, butter, and vegetable shortening - are high in calories, saturated fats, and refined carbohydrates. The recipe lacks any significant sources of fiber, vitamins, or minerals, which are essential for a balanced diet.
However, with a few tweaks, this recipe can be made healthier without compromising on taste:
- Replace half of the all-purpose flour with whole wheat flour to increase the fiber content and add a nutty flavor
- Reduce the amount of sugar in both the cookies and the cream filling by 25% to lower the overall calorie count
- Use coconut oil instead of butter and vegetable shortening to incorporate healthier fats
- Add a tablespoon of ground flaxseed to the cookie dough for a boost of omega-3 fatty acids and fiber
- Experiment with natural sweeteners like honey or maple syrup in place of some of the refined sugar
- Incorporate a small amount of finely grated zucchini or carrots into the cookie dough for added moisture and nutrients without affecting the taste
Editor's Opinion on This Homemade Oreos Recipe
This homemade Oreo recipe is a delightful take on the classic treat, offering a rich, chocolatey cookie paired with a creamy filling. The use of both granulated and brown sugar adds depth to the cookie's flavor, while the mandatory chilling step ensures a perfect texture. The cream filling, with its blend of butter and shortening, achieves the iconic Oreo consistency. Overall, the recipe is straightforward and yields impressive results, making it a fantastic choice for both novice and experienced bakers looking to recreate a beloved snack at home.
Enhance Your Homemade Oreos Recipe with These Unique Side Dishes:
Similar Recipes to Try If You Love Homemade Oreos
Appetizers and Main Dishes to Serve with Homemade Oreos
Why trust this Homemade Oreos Recipe:
This homemade oreos recipe is a must-try for any cookie lover. With a perfect balance of chocolatey goodness and a rich cream filling, it's sure to impress. The detailed instructions ensure you get the best results every time. Plus, using natural ingredients like unsalted butter and pure vanilla extract guarantees a superior taste. Trust this recipe for its simplicity and the delightful, authentic Oreo flavor it delivers.
Was this page helpful?
Have your own special recipe to share? Submit Your Recipe Today!
Related Recipes

No Bake Oreo Cheesecake Recipe

Oreo Milkshake Recipe
Snickers Ice Cream Pie Recipe

Hot Fudge Sundae Recipe

Chicken, Herb and Cheese Ravioli Recipe

Cookies and Cream Brownies Recipe

Chocolate Milkshake Recipe (Chick-fil-A Copycat)

Oreo Torte Recipe

Lemon Oreo Icebox Cake Recipe

Oreo Dirt Cup Recipe

Ice Cream Sundae Bar Recipe