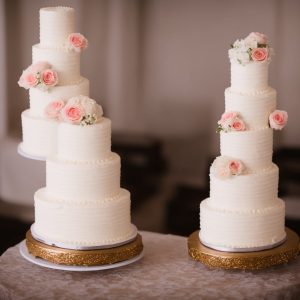
A wedding is a special occasion and what better way to celebrate than with a homemade wedding cake. This recipe is a simple yet elegant two-tier cake that will definitely impress your guests. It uses commonly found ingredients and easy-to-follow steps to create a delectable dessert that would be the centerpiece of any wedding reception.


Most of the ingredients for this recipe are common baking staples that can be found in any well-stocked pantry. However, you may need to go to the supermarket to pick up cake flour, which is finer and lighter than regular flour and will give your cake a softer, more delicate texture. Also, if you don't typically bake, you may need to purchase baking powder and baking soda. Lastly, you will need cake boards and cake dowels, which are used for stacking the cake tiers. These can usually be found in the baking aisle of larger supermarkets or at specialty baking stores.
Ingredients for Simple Homemade Wedding Cake
Cake flour: Cake flour is a finely milled flour that has a lower protein content than all-purpose flour. It's used in this recipe to create a softer, more delicate crumb in the cake.
Salt: A key ingredient in most baking recipes, salt enhances the flavors of the other ingredients.
Baking powder and baking soda: These are both leavening agents that help the cake rise.
Unsalted butter: Unsalted butter is used in both the cake and the frosting. It adds richness and moisture to the cake.
Granulated sugar: This is regular table sugar. It adds sweetness and also helps in the browning of the cake.
Eggs: Eggs contribute to the structure of the cake by adding moisture and fat.
Vanilla extract: Vanilla adds a sweet, creamy flavor that enhances the other ingredients.
Sour cream: Sour cream contributes to the moistness of the cake and gives it a slight tang.
Whole milk: Milk adds moisture and helps to create a tender crumb in the cake.
Confectioners’ sugar: Also known as powdered sugar, this is used in the frosting for a smooth and creamy texture.
Heavy cream: Used in the frosting, heavy cream makes it rich and creamy.
Cake dowels: These are used to provide support when stacking the cake tiers.
One reader, Chip Peters says:

This simple homemade wedding cake recipe was a game-changer for my wedding! The cake turned out moist and delicious, and the frosting was a hit with everyone. The instructions were easy to follow, and the end result was a beautiful and tasty cake that everyone loved. Highly recommend!
Key Techniques for Making a Simple Homemade Wedding Cake
How to prepare cake batter: The recipe requires specific steps to prepare the cake batter, including mixing the dry ingredients, beating the butter and sugar, and incorporating the wet ingredients. It's important to follow the instructions closely to ensure the batter turns out correctly.
How to frost a cake: The recipe provides detailed instructions on how to frost the cakes, including creating a crumb coat and applying the frosting evenly. It's essential to follow these steps to achieve a professional-looking finish on the wedding cake.
How to assemble a tiered cake: Assembling a tiered cake requires careful stacking and support to ensure stability. The recipe likely includes instructions on using cake boards and dowels to properly stack and support the tiers. Following these steps is crucial for a successful wedding cake presentation.
How To Make Simple Homemade Wedding Cake
Making a wedding cake might seem intimidating, but this recipe will teach you how to make one easily. The two-tier cake has a vanilla base & cream frosting.
Serves:
Ingredients
For 9-Inch Bottom Tier:
- 3⅔cupscake flour,spoon & leveled
- 1tspsalt
- 1tspbaking powder
- ¾tspbaking soda
- 1½cupsunsalted butter,softened to room temperature
- 2cupsgranulated sugar
- 3large whites eggs,(+ 2 additional eggs), at room temperature
- 1tbsppure vanilla extract
- ¾cupsour cream,(full-fat), at room temperature
- ¾cupwhole milk,at room temperature
For 6-Inch Top Tier:
- 1¾cupscake flour,spoon & leveled
- ¼tspsalt
- ¾tspbaking powder
- ¼tspbaking soda
- ½cupunsalted butter,softened to room temperature
- 1cupgranulated sugar
- 1large egg,(1 additional egg white), at room temperature
- 2tsppure vanilla extract
- ½cupsour cream,(full-fat), at room temperature
- ½cupwhole milk,at room temperature
For 9-inch Cake Frosting & Piping:
- 2cupsunsalted butter,softened to room temperature
- 8cupsconfectioners’ sugar
- 6tbspwhole milk,or heavy cream
- 1½tsppure vanilla extract
- ⅛tspsalt
For 6-inch Cake Frosting:
- 1cupunsalted butter,softened to room temperature
- 5cupsconfectioners’ sugar
- ¼cupheavy cream,or whole milk
- 1tsppure vanilla extract
- salt,to taste
Instructions
9-inch cake:
-
Preheat oven to 350 degrees F. Grease three 9×2-inch cake pans, line with parchment paper, then grease the parchment paper.
-
Whisk the cake flour, salt, baking powder, and baking soda together. Set aside. Using a handheld or stand mixer fitted with a paddle or whisk attachment, beat the butter and sugar together on high speed for about 3 minutes, until smooth and creamy.
-
Scrape down the sides and up the bottom of the bowl with a rubber spatula as needed. Beat in the 3 eggs, 2 egg whites, and vanilla extract on high speed for about 2 minutes until combined.
-
Beat in the sour cream. Scrape down the sides and up the bottom of the bowl as needed. With the mixer on low speed, add the dry ingredients until just incorporated.
-
With the mixer still running on low, slowly pour in the milk until combined. Do not over-mix. Whisk it all by hand a few times to make sure there are no lumps at the bottom of the bowl. The batter will be slightly thick.
-
Pour batter evenly into cake pans. Weigh them to ensure accuracy, if desired.
-
Bake for around 23 to 26 minutes or until the cakes are baked through. Allow cakes to cool completely in the pans set on a wire rack. The cakes must be completely cool before frosting and assembling.
-
Keep the oven on.
6-inch cake:
-
Prepare three 6×2-inch cake pans.
-
Prepare the 6-inch cake batter the same exact way as the bottom tier. The batter will be thinner than the bottom tier’s cake batter.
-
Pour batter evenly into cake pans. Weigh them to ensure accuracy, if desired.
-
Bake for around 18 to 22 minutes or until the cakes are baked through. Allow cakes to cool completely in the pans set on a wire rack. The cakes must be completely cool before frosting and assembling.
-
Using a large serrated knife, slice a thin layer off the tops of all the cakes to create a flat surface. Discard the leveled off piece (or crumble over ice cream!).
9-inch Cake Frosting & Piping:
-
In a large bowl using a hand-held mixer or stand mixer fitted with a paddle attachment, beat the butter on medium speed for about 2 minutes until creamy. Add confectioners’ sugar, milk, vanilla extract, and salt with the mixer running on low.
-
Increase to high speed and beat for 2 minutes. Add more confectioners’ sugar if frosting is too thin, more milk if frosting is too thick, or an extra pinch of salt if frosting is too sweet.
-
Prepare the rest of the frosting now, if desired, or begin decorating the 9-inch tier.
-
To decorate, place a 9 to 10 inch cake board on a cake turner. Place 1 cake layer on the cake board.
-
Using a large icing spatula, evenly cover the top with a scant 1½ cups of frosting. Top with 2nd cake layer and evenly cover the top with a scant 1½ cups of frosting.
-
Top with the third cake layer. Using about 1¼ cups of frosting, spread it all over the top and sides in a thin layer, also called a crumb coat. A large icing spatula and bench scraper are helpful for applying the crumb coat.
-
Set leftover frosting aside at room temperature.
-
Using the cake board to pick up the cake, place the cake in the refrigerator to help set the crumb coat while working on the top tier.
6-inch Cake Frosting & Piping:
-
Make the frosting for the 6 inch cake similar to how the 1st batch of frosting was prepared.
-
Place a 6-inch cake board on a cake turner. Place 1 6-inch cake layer on the cake board. Using a small icing spatula, evenly cover the top with a scant ¾ cup of frosting.
-
Top with 2nd cake layer and evenly cover the top with a scant ¾ cup of frosting. Top with the third cake layer.
-
Using about ¾ cup of frosting, spread it all over the top and sides in a thin layer, also called a crumb coat.
-
Using the cake board to pick up the 6-inch cake. Carefully place the cake in the refrigerator to help set the crumb coat while working on the exterior frosting on the top tier.
-
Remove the bottom tier from the refrigerator (along with the cake board) and place on the cake turner. Apply the remaining frosting for the bottom tier on the cake, reserving about 6 to 8 Tablespoons for piping detail. Carefully lift the cake (with the cake board) and place on a serving platter or cake stand.
-
Wash and dry 4 cake dowels. Measure the height of the bottom cake. Measure and cut the cake dowels to match.
-
Staying within a 6-inch circle diameter, insert the dowels into the cake, spacing them about 2 inches apart to form 4 corners of a square. Push the dowels straight down until each touches the bottom cake board. Set aside.
-
Remove the top tier from the refrigerator (along with the cake board) and place on the cake turner. Decorate similar to the bottom tier. Along with the cake board, carefully lift the small cake and gently place it in the very center of the bottom tier.
-
After placing the small tier on top, pipe leftover frosting around the bottom of it.
-
Add any decorative pieces, such as artificial flowers.
-
Refrigerate cake until ready to serve. After a few hours, the frosting will “set” and the cake can then be lightly covered with plastic wrap.
-
Cover any leftover cake tightly and refrigerate for up to 1 week.
Nutrition
- Calories: 587.65kcal
- Fat: 29.59g
- Saturated Fat: 18.39g
- Trans Fat: 1.06g
- Monounsaturated Fat: 7.71g
- Polyunsaturated Fat: 1.28g
- Carbohydrates: 79.21g
- Fiber: 0.36g
- Sugar: 61.78g
- Protein: 3.22g
- Cholesterol: 96.48mg
- Sodium: 332.39mg
- Calcium: 54.32mg
- Potassium: 67.51mg
- Iron: 1.73mg
- Vitamin A: 256.63µg
- Vitamin C: 0.08mg
Crucial Technique Tip for Baking a Simple Homemade Wedding Cake
When frosting your wedding cake, it's important to apply a crumb coat first. This is a thin layer of frosting that helps to seal in the crumbs so they don't mix into your final layer of frosting. After applying the crumb coat, chill the cake in the refrigerator for about 15-20 minutes to allow the frosting to set before applying the final layer. This will give your cake a clean, professional look.
Time-Saving Tips for Baking a Homemade Wedding Cake
Prepare the ingredients: Gather all the necessary ingredients and measure them out before starting. This will help streamline the baking process and prevent any last-minute scrambling for items.
Plan ahead: Create a timeline for the cake preparation, including baking and cooling times, to ensure everything runs smoothly and efficiently.
Use quality tools: Invest in high-quality baking tools and equipment to make the process more efficient and enjoyable.
Room temperature ingredients: Bring the butter, eggs, and other refrigerated ingredients to room temperature before starting. This will help them mix more easily and evenly into the batter.
Organize the workspace: Keep the kitchen organized and clean as you work to minimize any unnecessary clutter and save time during the baking process.
Substitute Ingredients For Simple Homemade Wedding Cake Recipe
cake flour - Substitute with all-purpose flour: All-purpose flour can be used as a substitute for cake flour by adding 2 tablespoons of cornstarch for every cup of all-purpose flour to mimic the lower protein content of cake flour, resulting in a lighter texture for the cake.
unsalted butter - Substitute with margarine: Margarine can be used as a substitute for unsalted butter in baking, providing a similar fat content and texture to the cake.
granulated sugar - Substitute with caster sugar: Caster sugar, also known as superfine sugar, can be used as a substitute for granulated sugar to ensure a smoother texture in the cake batter.
sour cream - Substitute with Greek yogurt: Greek yogurt can be used as a substitute for sour cream to add moisture and a tangy flavor to the cake batter.
whole milk - Substitute with almond milk: Almond milk can be used as a substitute for whole milk to provide a dairy-free alternative with a similar creamy texture for the cake batter.
confectioners’ sugar - Substitute with powdered sugar: Powdered sugar can be used as a substitute for confectioners’ sugar to achieve the same sweetness and smooth texture in the frosting.
heavy cream - Substitute with coconut cream: Coconut cream can be used as a substitute for heavy cream to provide a dairy-free alternative with a rich and creamy texture for the frosting.
Presentation Ideas for a Simple Homemade Wedding Cake
Elevate the cake tiers: Stack the tiers using cake dowels to ensure stability and create a visually stunning multi-tiered cake.
Incorporate edible flowers: Adorn the cake with delicate, edible flowers to add a touch of elegance and a pop of color.
Create a smooth frosting finish: Achieve a flawless, professional look by using a bench scraper to smooth the frosting on the cake tiers.
Add intricate piping details: Use the reserved frosting to create intricate piping details around the base of each tier, showcasing precision and artistry.
Garnish with fresh berries: Arrange fresh, vibrant berries around the base of the cake for a burst of color and a touch of natural sweetness.
Present on a decorative cake stand: Showcase the wedding cake on a stunning, ornate cake stand to elevate its visual impact and create a focal point.
Use ambient lighting: Highlight the cake with soft, warm lighting to accentuate its beauty and create an inviting ambiance.
Serve with a side of coulis: Accompany each slice of cake with a drizzle of fruit coulis for a sophisticated and flavorful addition.
Essential Tools for Baking a Homemade Wedding Cake
- Oven: A kitchen appliance used for baking and roasting food by surrounding it with dry heat.
- Cake pans: Round or square pans used for baking cakes, available in various sizes.
- Parchment paper: A non-stick paper used for lining cake pans to prevent sticking and for easy removal of baked goods.
- Handheld mixer or stand mixer: Electric kitchen appliances used for mixing, beating, and whipping ingredients in baking and cooking.
- Paddle or whisk attachment: Attachments for stand mixers used for mixing cake batters and frostings.
- Rubber spatula: A flexible kitchen tool used for scraping batter from bowls and folding ingredients together.
- Serrated knife: A knife with a serrated edge used for leveling cake layers and slicing through delicate baked goods.
- Icing spatula: A long, flat metal spatula used for spreading and smoothing frosting on cakes.
- Bench scraper: A tool with a flat, wide metal or plastic blade used for smoothing and shaping frosting on cakes.
- Cake turner: A rotating cake stand used for decorating and frosting cakes.
- Cake board: A sturdy cardboard or foam board used as a base for assembling and decorating cakes.
- Cake dowels: Wooden or plastic rods used to support and stabilize tiered cakes.
- Decorative pieces: Edible or non-edible decorations such as flowers, pearls, or sprinkles used for decorating cakes.
Storing and Freezing Your Homemade Wedding Cake
Cover the cake tightly with plastic wrap or aluminum foil to prevent it from drying out or absorbing any odors from the refrigerator. You can store the cake in the fridge for up to 5 days.
If you want to freeze the cake, wrap it tightly in plastic wrap, then in aluminum foil. Place the wrapped cake in a freezer-safe container or freezer bag. Label the container with the date and type of cake. Freeze for up to 2-3 months.
To thaw a frozen cake, remove it from the freezer and let it thaw in the refrigerator overnight. Once thawed, remove the wrapping and let the cake come to room temperature before serving.
If you have leftover frosting, store it in an airtight container in the refrigerator for up to 1 week or in the freezer for up to 2 months. To use frozen frosting, thaw it in the refrigerator overnight, then beat it with a mixer until it's smooth and fluffy again.
If you want to make the cake ahead of time, you can bake the cake layers and freeze them for up to 2 months. Wrap each layer tightly in plastic wrap, then in aluminum foil, and place them in a freezer-safe container. When you're ready to assemble the cake, thaw the layers in the refrigerator overnight, then frost and decorate as desired.
If you have leftover cake, you can freeze individual slices for up to 2 months. Wrap each slice tightly in plastic wrap, then in aluminum foil, and place them in a freezer-safe container. To thaw, remove a slice from the freezer and let it thaw at room temperature for about 30 minutes.
Interesting Fact About Homemade Wedding Cakes
The recipe includes a traditional wedding cake that can be customized to suit the couple's preferences, making it a memorable and personal touch to their special day.
Is Making a Homemade Wedding Cake Cost-Effective?
After carefully analyzing the cost of the ingredients and considering the serving size, I would rate this recipe an 8/10 for cost-effectiveness. The approximate cost for a household of 4 people would be around $50-$60. This wedding cake recipe requires a significant amount of ingredients, especially for the frosting and multiple tiers, which can contribute to the overall cost. However, the grandeur and celebratory nature of a homemade wedding cake make it a worthwhile investment for special occasions.
Is This Homemade Wedding Cake Recipe Healthy or Not?
This homemade wedding cake recipe, while delicious and indulgent, is not particularly healthy. The cake is high in calories, sugar, and fat due to the large amounts of butter, sugar, and heavy cream used in the batter and frosting. The refined flour used in the recipe also lacks fiber and essential nutrients.
However, it's important to remember that wedding cakes are typically enjoyed in moderation as part of a special celebration. Indulging in a slice of this cake occasionally is unlikely to have a significant impact on overall health, especially when consumed as part of a balanced diet.
To make this recipe slightly healthier without compromising taste and texture, consider the following suggestions:
- Reduce the amount of sugar in the batter and frosting by 10-20%, as the recipe seems quite sweet
- Replace some of the butter with Greek yogurt or applesauce to lower the fat content and add moisture
- Use whole wheat pastry flour for a portion of the cake flour to increase fiber and nutrient content
- Incorporate fresh fruit between the cake layers to add natural sweetness and reduce the amount of frosting needed
- Opt for a lighter frosting, such as a whipped cream cheese frosting, to decrease the overall calorie and fat content
Remember, the key to enjoying this wedding cake is to savor a sensible portion and balance it with an overall healthy lifestyle that includes regular exercise and a nutrient-rich diet.
Editor's Opinion on This Simple Homemade Wedding Cake Recipe
The recipe you provided for a simple homemade wedding cake is well-structured and detailed, making it accessible for both experienced and novice bakers. The step-by-step instructions and precise measurements ensure a successful outcome. However, it's important to note that creating a wedding cake can be a complex and time-consuming process, so it's essential to plan ahead and allow ample time for preparation and assembly. Additionally, personalizing the cake with decorative elements and flavors can elevate the overall presentation and taste, making it a memorable centerpiece for any wedding celebration.
Enhance Your Simple Homemade Wedding Cake Recipe with These Unique Side Dishes:
Alternative Homemade Wedding Cake Recipes to Try
Appetizer and Main Course Suggestions for Your Homemade Wedding Cake
Why trust this Simple Homemade Wedding Cake Recipe:
This recipe offers a perfect balance of moisture and flavor, ensuring a delicious and visually stunning wedding cake. The precise measurements and detailed instructions guarantee a successful outcome, while the use of high-quality ingredients such as pure vanilla extract and unsalted butter ensures a rich and indulgent taste. The step-by-step process and attention to detail reflect the expertise and passion of a seasoned culinary genius, making it a trustworthy choice for any special occasion.
Was this page helpful?
Have your own special recipe to share? Submit Your Recipe Today!
Related Recipes
Italian Wedding Cake Recipe
Hawaiian Wedding Cake Recipe
Wedding Cake Icing Recipe
Yellow Birthday Cupcakes Recipe
One Layer Strawberry Shortcake Cake Recipe

Baked Honey BBQ Popcorn Chicken Recipe
Salted Caramel Dark Chocolate Cookies Recipe
Decadent Chocolate Cheesecake Recipe
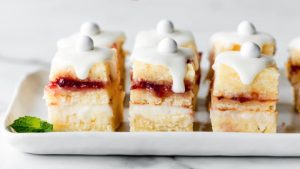
Lemon Berry Petit Fours Recipe
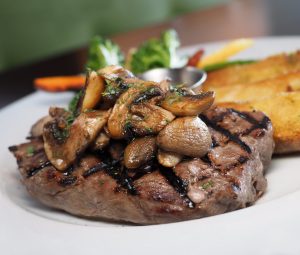
The Capital Grille Filet Mignon Recipe (Copycat)

Beef with Cheese Tortellini (Olive Garden Copycat)