Photos of Rainbow Sprinkle Funfetti Cake Recipe
How To Make Rainbow Sprinkle Funfetti Cake
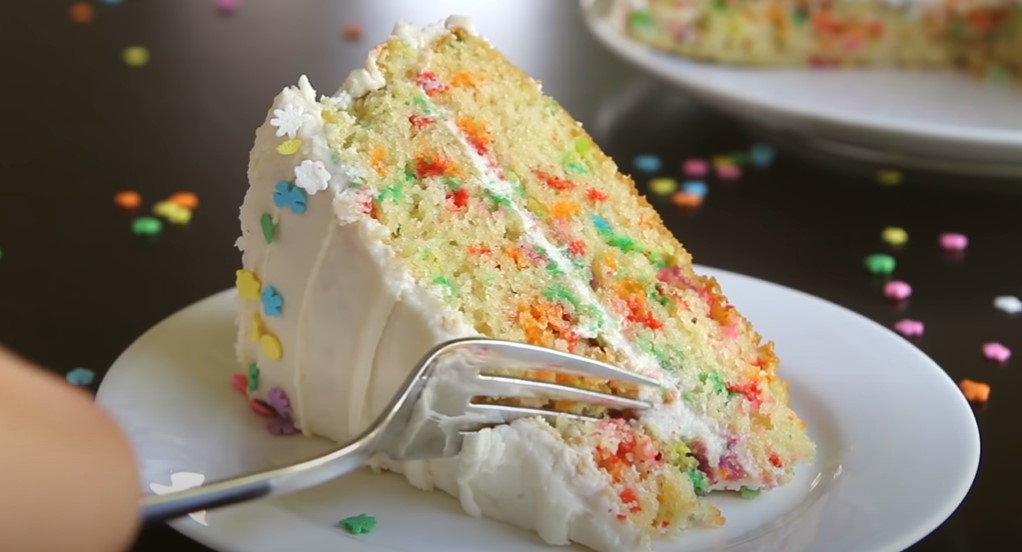
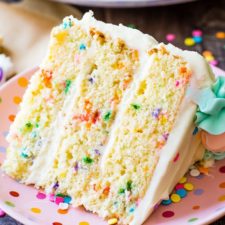
There’s a lot to enjoy in this funfetti cake, from the smooth cream cheese frosting, the tender cake, and to the generous coating of sprinkles.
Serves:
Ingredients
For Cake:
- cupscupsall purpose flour,spooned into measuring cup and leveled off
- ½tspbaking powder
- ½tspbaking soda
- ¾tspsalt
- 1cupunsalted butter,(2 sticks), softened
- 2cupssugar
- 4eggs
- 2tspvanilla extract
- 1cupbuttermilk
- ⅓cuprainbow sprinkles
For Frosting and Decoration:
- ¾cupunsalted butter,(1½ sticks), softened
- 4ozcream cheese,at room temperature
- 6cupsconfectioner’s sugar
- 2tspvanilla extract
- 2pinchesgenerous salt
- 1½cupsrainbow sprinkles
Instructions
-
Preheat the oven to 350 degrees F and set an oven rack in the middle position. Spray two 8-inch cake pans with nonstick cooking spray.
-
Cut two 8-inch rounds of parchment paper and line the bottom of each pan, then spray the paper with nonstick cooking spray. (To measure the parchment paper, just trace the bottom of the pan.)
-
In a medium bowl, whisk together the flour, baking powder, baking soda, and salt. Set aside.
-
In the bowl of an electric mixer fitted with the paddle attachment (or beaters), cream the butter and sugar on medium speed (or medium-high speed if using a hand-held mixer) until light and fluffy.
-
Scrape the bowl once during this process to make sure everything is evenly combined. Scrape the sides of the bowl again.
-
With the mixer on low, add the eggs one at a time, beating well after each addition. Don’t worry if the batter looks curdled at any point during the mixing process.
-
Mix in the vanilla, then increase the speed to medium (or medium-high if using a hand-held mixer) and beat until the mixture is light and fluffy. Scrape the bowl and briefly mix again.
-
On low speed, alternately add the whisked dry ingredients in three additions and the buttermilk in two: dry, wet, dry, wet, dry. When everything is just incorporated, remove the bowl from the mixer.
-
Scrape the bowl as necessary, and fold in the sprinkles by hand using a spatula.
-
Pour the batter evenly into the cake pans and use the back of the spatula to smooth the batter and bake for 30 to 35 minutes, or until the cakes are golden and set, a cake tester inserted into the middle comes out clean, and the edges are pulling away from the pan.
-
Cool the cakes in the pans on a rack for about 20 minutes. When the pans are cool enough to handle, run an offset spatula or a knife around the rim, and turn the cakes out onto the rack. Let fully cool.
-
Once the cake layers are cool, use a long serrated knife to cut off the domed top of the cake layers so that they are flat. Discard (or snack on) the domed top. Repeat with the additional layer, and set aside.
-
Put one cake layer on a cake stand or serving platter with the cut-side up. Put about 1 cup of the frosting in the center and, using the back of an offset spatula (or a butter knife), spread the frosting evenly just to the edge of the cake.
-
Add the second cake layer on top of the first, so that the cut-side is down (and the bottom of the cake is on top). Scoop about 1 cup of the frosting onto the center of the cake and spread it to the edge. Get eye level with the cake to make sure that everything looks even.
-
Put a ¼-cup blob of frosting on the side of the cake, and use an offset spatula to spread it over a section of cake. Rotate the cake stand while coating.
-
Repeat until the entire side of the cake is covered fully.
-
Place the cake, uncovered, in the refrigerator for 15 to 30 minutes to set.
-
Remove the cake from the refrigerator. Place the cake next to the sink and turn on the hot water.
-
Hold an offset spatula (or butter knife) under the hot water for a few seconds to warm it. Tap off any excess water, and then slowly run the hot spatula over an area of frosting until it is smooth and glossy.
-
Continue this process over the entire cake, warming the spatula under hot water as necessary, until the cake is smooth and glossy all over.
-
This process both evens out any bumps in the frosting and also creates a “sticky” surface for the sprinkles to adhere.
-
Place the cake stand on a 13×18-inch sheet pan. This will catch the falling sprinkles. Fill a small bowl with about the sprinkles.
-
Gather a handful of sprinkles and gently press them into the side of the cake, working from the base of the cake to the top edge. Stop at the edge and don’t “round the corner” onto the top of the cake.
-
Rotate the cake stand and repeat, going all the way around. Gather another large handful of sprinkles and sprinkle them over the top of the cake.
-
Scrape any “fallen” sprinkles off of the cake stand and wipe the edges of the cake stand clean with a damp paper towel, if necessary. The cake can be stored in a cake dome at room temperature for up to 3 days.
Frosting:
-
In the bowl of an electric mixer fitted with the paddle attachment (or beaters), beat the butter and cream cheese until creamy and evenly combined.
-
With the mixer on low speed, gradually add the confectioners’ sugar until incorporated, then beat in the vanilla and salt. Increase the speed to medium-high (or high speed if using a hand-held mixer) and beat until fluffy.
Nutrition
- Calories: 1797.49kcal
- Fat: 55.45g
- Saturated Fat: 33.43g
- Trans Fat: 1.87g
- Monounsaturated Fat: 14.42g
- Polyunsaturated Fat: 2.96g
- Carbohydrates: 310.44g
- Fiber: 3.38g
- Sugar: 212.87g
- Protein: 18.60g
- Cholesterol: 232.64mg
- Sodium: 579.72mg
- Calcium: 129.37mg
- Potassium: 264.36mg
- Iron: 6.48mg
- Vitamin A: 491.68µg
- Vitamin C: 0.35mg
Was this page helpful?
Have your own special recipe to share? Submit Your Recipe Today!
Related Recipes

Funfetti Cheesecake Recipe

Hot Dog on a Stick’s Funfetti Cake Recipe

Homemade Birthday Cake Milkshakes Recipe

Chex Funfetti Cake Batter Buddies Recipe
Funfetti® Cake Batter Ice Cream Recipe

Funfetti Dip Recipe

Funfetti Banana Bread Recipe

Funfetti Blondie Recipe

Copycat Steak and Shake Vanilla Milkshake Recipe

Funfetti Granola Bites Recipe
Funfetti Layer Cake Recipe