Clarified butter, also known as ghee, holds a prominent place in various cuisines around the world. The golden liquid that is left after the milk solids are removed from regular butter, it adds a rich, nutty flavor to your recipes. This process not only increases the smoke point of the butter, making it perfect for high-heat cooking, but also extends the shelf-life by removing elements that make butter go rancid.
The only ingredient you need for this recipe is butter. While most households have butter at their disposal, it's worth mentioning that quality matters. When buying butter from a supermarket, go for unsalted, grass-fed varieties if possible. The better the quality of the butter used, the more flavorful your clarified butter will be.
Clarified Butter Preparation Method Ingredients
Butter: Butter is a dairy product made from the fat and protein components of milk or cream. It is a semi-solid emulsion at room temperature, consisting of approximately 80% butterfat. In this recipe, it is clarified to remove the milk solids and water.
One reader, Klaus Collett says:

The clarified butter preparation method is a game-changer! It's so easy to follow and the end result is pure liquid gold. The buttery flavor is intensified, and it's perfect for cooking at high temperatures. I love how versatile and long-lasting it is. Highly recommend trying it out!
Techniques Required for Clarified Butter Preparation
How to clarify butter: A method to remove milk solids from butter, resulting in a clear, golden liquid with a high smoke point, ideal for cooking and sautéing.
How To Make Clarified Butter
For this butter recipe, we show you how you can easily clarify butter at home. Have those milk content removed for a lesser lactose intake.
Serves:
Ingredients
- 1lbbutter
Instructions
-
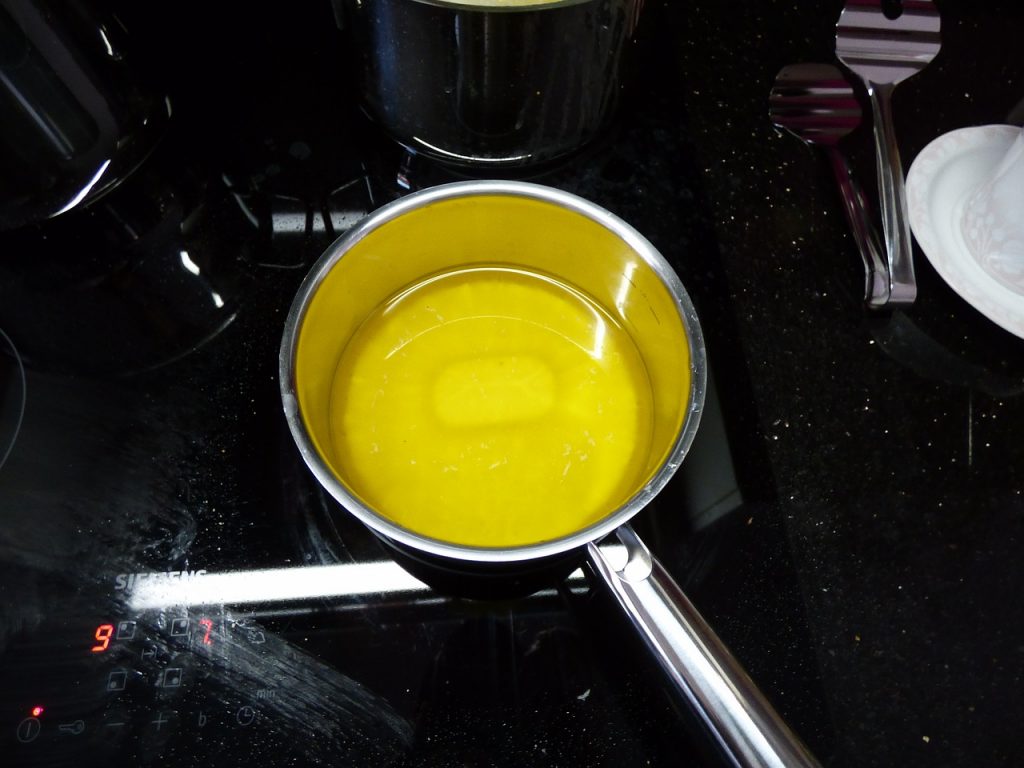
Place butter in a small saucepan and melt over low heat.
-
Cook at a low temperature ensuring the butter isn’t browning while gently skimming the foam off the top. This can take a little time, be patient.
-
Once the foam has been removed and you’re left with a yellow liquid, allow it to cool/rest for about 5 to 7 minutes. You’ll see some sediment at the bottom (these are the milk solids).
-
Line a mesh strainer with a coffee filter or cheesecloth and gently pour the golden liquid into a container while leaving any solids behind.
-
Refrigerate clarified butter up to 1 month.
Nutrition
- Calories: 3252.26kcal
- Fat: 367.91g
- Saturated Fat: 233.00g
- Trans Fat: 14.87g
- Monounsaturated Fat: 95.35g
- Polyunsaturated Fat: 13.80g
- Carbohydrates: 0.27g
- Sugar: 0.27g
- Protein: 3.86g
- Cholesterol: 975.22mg
- Sodium: 49.90mg
- Calcium: 108.86mg
- Potassium: 108.86mg
- Iron: 0.09mg
- Vitamin A: 3102.57µg
Mastering the Art of Clarified Butter: Technique Tips
When making clarified butter, it's important to keep the heat low and slow. This allows the milk solids to separate properly without burning. If the heat is too high, the butter may burn and give a bitter taste to your clarified butter. Also, using a coffee filter or cheesecloth when straining can help ensure that no solids are left in your clarified butter, resulting in a pure, clean product.
Time-Saving Tips for Making Clarified Butter
Plan: Before you start, read through the entire recipe and gather all the necessary ingredients and equipment. This will help you work more efficiently and avoid any last-minute surprises.
Room temperature: Bring the butter to room temperature before starting. This will help it melt more evenly and speed up the clarifying process.
Skim efficiently: Use a wide, shallow spoon to skim the foam off the top of the melting butter. This will help you remove the foam more efficiently and save time.
Chill quickly: After straining the clarified butter, place it in an ice bath to cool it down faster. This will save you time compared to letting it cool at room temperature.
Storage prep: Have your storage containers ready before you start the process. This way, you can quickly transfer the clarified butter once it's ready.
Substitute Ingredients For Clarified Butter Recipe
Butter - Substitute with ghee: Ghee is a type of clarified butter commonly used in Indian cooking. It has a nutty flavor and a higher smoke point, making it suitable for sautéing and frying.
Butter - Substitute with coconut oil: Coconut oil can be used as a dairy-free alternative to clarified butter. It adds a subtle coconut flavor to dishes and works well in both sweet and savory recipes.
Presenting Clarified Butter: Best Practices
Elevate the plating: Present the clarified butter in a small, elegant ramekin or a delicate glass jar to showcase its golden hue and luxurious texture.
Garnish with finesse: Sprinkle a pinch of flaky sea salt on top of the clarified butter to add a touch of sophistication and enhance the flavor.
Accompany with artisanal bread: Serve the clarified butter alongside freshly baked sourdough or artisanal bread, sliced and arranged in a rustic manner to create a visually appealing presentation.
Incorporate herb-infused butter: Introduce a variety of herb-infused clarified butters, such as rosemary or thyme infused, and present them in individual, intricately designed butter dishes to offer a selection of flavors.
Utilize elegant serving utensils: Use ornate butter spreaders or small, polished spoons to serve the clarified butter, adding a touch of refinement to the dining experience.
Essential Tools for Making Clarified Butter
- Saucepan: A deep cooking vessel with a handle and a lid, used for cooking sauces, soups, and other liquids.
- Mesh strainer: A fine, woven metal or plastic sieve used to strain liquids and separate solids from liquids.
- Coffee filter or cheesecloth: A porous material used to strain and filter liquids, such as coffee filters or cheesecloth, to remove impurities from the clarified butter.
Storing and Freezing Clarified Butter: A Guide
Once the clarified butter has cooled completely, transfer it to an airtight container or jar with a tight-fitting lid. Make sure the container is clean and dry to prevent any contamination.
If you plan to use the clarified butter within a month, you can store it in the refrigerator. It will solidify when chilled, but it will return to a liquid state when brought back to room temperature.
For longer storage, you can freeze clarified butter for up to 6 months. Pour the cooled liquid into ice cube trays or small freezer-safe containers, leaving some headspace for expansion. Once frozen, transfer the cubes or portions to a freezer bag or container, labeling it with the date.
To use frozen clarified butter, simply remove the desired amount and let it thaw in the refrigerator or at room temperature. You can also melt it directly in a pan over low heat.
Avoid storing clarified butter at room temperature for extended periods, as it can spoil and develop off-flavors. Always keep it refrigerated or frozen to maintain its quality and freshness.
When using clarified butter from the refrigerator or freezer, make sure to use clean utensils to prevent introducing any moisture or contaminants into the container.
How To Reheat Leftover Clarified Butter
The best way to reheat leftover clarified butter is to place it in a small saucepan over low heat. Gently warm the butter, stirring occasionally, until it's melted and heated through. This method ensures that the butter doesn't burn or develop off-flavors.
Another option is to use a microwave. Place the desired amount of clarified butter in a microwave-safe container and heat it in short intervals, stirring between each interval, until it's melted and warm. Be careful not to overheat the butter, as it can cause it to splatter or burn.
If you only need a small amount of clarified butter, you can simply scoop out what you need from the container and let it soften at room temperature. This works well for spreading on toast or using in recipes that don't require melted butter.
When reheating larger quantities of clarified butter, you can also use a double boiler. Place the butter in a heatproof bowl and set it over a pot of simmering water. Stir the butter occasionally until it's melted and heated through. This gentle heating method prevents the butter from burning or separating.
Regardless of the method you choose, always stir the clarified butter well before using it to ensure that it's evenly heated and any separated layers are recombined. If stored properly in an airtight container in the refrigerator, clarified butter can last up to 1 month, so you'll have plenty of opportunities to enjoy it in your favorite recipes.
Fascinating Facts About Clarified Butter
The process of making clarified butter, also known as ghee, has been used for centuries in Indian and Middle Eastern cuisines. It is a staple ingredient in many traditional dishes and is known for its rich, nutty flavor. Clarified butter has a higher smoke point than regular butter, making it ideal for sautéing and frying. It also has a longer shelf life due to the removal of milk solids, which can spoil. Additionally, it is a popular choice for those with lactose intolerance as the milk solids are removed during the clarification process. This versatile ingredient adds a delicious depth of flavor to a wide range of dishes.
Is Making Clarified Butter at Home Cost-Effective?
This clarified butter preparation method is highly cost-effective for households. With just one pound of butter, it yields a substantial amount of clarified butter, making it an economical choice. The approximate cost for a household of four people is minimal, as it requires only a single ingredient. The versatility of clarified butter also adds value, as it can be used in a wide range of recipes, from sautéing vegetables to making desserts. Overall Verdict: 9/10.
Is Clarified Butter Healthy or Unhealthy?
While clarified butter, also known as ghee, has been a staple in many cuisines for centuries, it's important to consider its nutritional value. Clarified butter is essentially pure butterfat, with the water and milk solids removed. This process concentrates the fat content, making it a high-calorie ingredient. A single tablespoon of clarified butter contains around 120 calories and 14 grams of fat, mostly saturated fat.
Consuming excessive amounts of saturated fat has been linked to an increased risk of heart disease, high cholesterol levels, and obesity. However, it's worth noting that some studies suggest that the unique fatty acid profile of ghee, which includes short-chain and medium-chain triglycerides, may have potential health benefits when consumed in moderation.
To make this recipe healthier, consider the following suggestions:
- Use clarified butter sparingly, as a flavor enhancer rather than a primary cooking fat
- Replace some or all of the clarified butter with healthier cooking oils, such as olive oil, avocado oil, or coconut oil
- Incorporate clarified butter into a balanced diet that includes plenty of fruits, vegetables, whole grains, lean proteins, and healthy fats
- If you have a history of heart disease or high cholesterol, consult with your healthcare provider before adding clarified butter to your diet
Editor's Take on Clarified Butter Preparation
The clarified butter preparation method is a classic technique that results in a rich and pure butter flavor. The instructions are clear and easy to follow, ensuring that the butter is properly clarified without browning. This clarified butter can be used in a variety of culinary applications, adding a delicious depth of flavor to dishes. It's a versatile ingredient that can elevate both sweet and savory recipes, making it a valuable addition to any kitchen. Overall, this recipe provides a simple and effective method for preparing clarified butter, and the end result is well worth the effort.
Why trust this Clarified Butter Recipe:
This recipe for clarified butter is a trusted method used by professional chefs for centuries. The slow melting process ensures that the butter is not overheated, preserving its natural flavors. By gently skimming off the foam, the resulting butter is pure and free from impurities. The use of a coffee filter or cheesecloth guarantees that only the golden liquid is retained, leaving behind any milk solids. This ensures a smooth and clear clarified butter that is perfect for high-heat cooking, baking, or as a flavorful topping. Trust in this time-honored technique to elevate your culinary creations.
Was this page helpful?
Have your own special recipe to share? Submit Your Recipe Today!
Related Recipes